Step 1: Go to the Entrecard homepage, and then got to the area that displays: For Advertisers (New!!).
This is what is displayed:
– Self-service advertising.
– Reach across tens of thousands of blogs.
– Target more than fifty vertical niches and categories.
– CPM rates from .30 to .60.
– CPC rates from .02 to .04.
Step 2: Click Sign up as an advertiser! and then proceed from there, filling in essential information such as your username and password.
Skip to Step 3 now if you wish (terms/details listed below).
Information: Guidelines, Terms, and Conditions for Advertisers
– All ads will be approved first by the Entrecard staff, and second by the individual bloggers publishing your ads.
– Sites that advertisers are placing adverts on are required to place their ad-serving widget within one page-down of the top of their blog.
– High standards must be followed when placing ads on any site in the network.
Unsuitable/Not Permitted Advertisements
– The following ads are not permitted: male enhancement ads, adult-themed ads, any ad that links to a site with nudity, gambling or casino ads, ads for drugs, ads that link to sites selling prescription drugs, ads using images of scantily clad women, ads that are offensive, unprofessional, in poor taste, etc., ads for sites that are part of money-making schemes, and so on.
– Absolutely NO ADS/IMAGES or LINKS/SITES will be permitted that have the content listed above on them.
– You must change your link or image to a suitable one, or you will then have to request a refund after thirty days.
Approval Process, Publishers, and Some Guarantees
– No guarantees are made as to how many publishers approve your ad.
– Publishers/bloggers will approve most, if not all, advertisements within 24 hours, often more frequently. The number of people approving your ad versus denying it is your approval ratio.
Campaign Targeting and Redirecting
– Redirects are allowed for targeting and tracking purposes only.
– You may never change the target of the redirect after your campaign is approved by the staff. The end-target of the campaign must be the same for the duration of the campaign as it was approved initially. No refund will be given for accounts that do not follow this rule.
Creating a Successful Campaign
– Be sure that you select a category that is somewhat relevant to your site, or it won't be viewed by the right group of people and your ad will be displayed on less blogs due to a lower approval ratio.
– Advertisement designs that are more attractive and professional will see higher approval ratios and more clicks.
– The target links that have been targeted to the specific categories and are blogs themselves will be seen and clicked through more often than traditional websites or sites that aren't really relevant to the site.
– Type of site - don't advertise sites that themselves aren't professionally done or don't have content that people are looking for.
As an advertiser, at this time, you don't have control over what specific sites you target, as you could (in many cases) target members of the site directly for this opportunity. There are plans in the future to allow more targeted advertisements, but for now they are by category and site-wide only. Therefore, you could be displaying ads on sites that have thousands of visitors per day or some with just a few.
Refunds
All sales are final, therefore refunds cannot be given. Test a campaign by filling out all details, other than adding funds to your account.
Reports
Advanced reports will be given from the dashboard of your advertiser account. The number of impressions, clicks, and more will be displayed in this area.
Funding and Purchasing Advertisements
Funding is done through PayPal. First add funds to your account, then add more to continue your campaign. Choose CPM or CPC based on what item/blog you are planning on advertising through the network and your budget/plan.
All Campaigns Start in Paused Mode
Due to this, you will have to start or pause the campaign as long as you have funds in your account. Campaigns will be paused when you run out of money in your account.
Step 3: You will be greeted with a Dashboard area for managing your account upon signing in.

To the left, you have an overview of your balance and campaigns. There are links to increase the balance in increments: $10, $25, $50, $100, $250, $500, $1000, etc. You can view previous transactions by clicking the appropriate link/button.
Campaigns will be listed below, from which you can view archived/previous campaigns or quickly update the currently running campaigns.
To the right, you can see the Ratecard, which has the rates as follows:
– CPM (Cost Per 1,000 Impressions): $0.30 across the entire network and $0.60 when targeting specific categories.
– CPC (Cost Per Click): $0.02 across the entire network and $0.04 when targeting specific categories.
Step 4: Creating your first campaign.
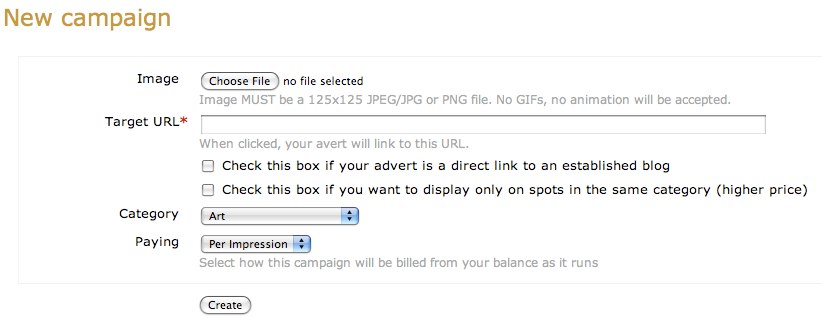
Click the "New Campaign" link under the Current Campaigns area on the Dashboard. This will bring up a new page with several options and configuration settings.
First, select an image (JPG/PNG - no GIFs or animated ads), a target URL, whether your advert is a direct link to an established blog, whether you want to display only in spots in the same category, which category you are targeting, and your payment (per impression or per click).
You're done! All you have to do at this point is go back to the Dashboard (you should be automatically redirected/given the option), and then you can "start" the campaign. Your balance will gradually decrease, depending on the number of clicks or impressions.
No comments:
Post a Comment